Raspberry Pi recipes

Photo: Philipp Bohk, CC BY-SA 3.0, via Wikimedia Commons
How to Automatically Install an OS even if you are using your Pi without a display?
Well, it turns out you can still use NOOBS to easily install an OS of your choice :-).
To set up NOOBS to automatically and silently (i.e. without requiring any user input) install a specific OS, follow these steps:
Prerequisite: You followed the official Raspberry Pi Quick start guide on how to prepare your SD card for your Pi.
Unzip the downloaded latest NOOB version…
Delete all OS sub directories from the
/osdirectory - only leaving the desired OS in the directory (e.g./os/Raspbian).If the OS you want to automatically install has multiple flavours available (as
Raspbiandoes) edit theflavours.jsonfile so that it only contains the flavour entry that you want to install.Edit the
/recovery.cmdlinefile in the root NOOBS directory and appendsilentinstallto the arguments list.Copy all files from the NOOBs distribution onto the SD Card…
…and remove any OS-specific meta files and directories (e.g. on OSX
sudo rm -rf .Spotlight-V100/ .Trashes/ ._.Trashes .fseventsd/).Now boot up your Raspi…
Initial setup and configuration tasks
With your Raspberry Pi connected via ethernet ssh into it:
$ ssh pi@PI-IP-ADDRESS
If you read:
NOTICE: the software on this Raspberry Pi has not been fully configured. Please run ‘sudo raspi-config’
$ sudo raspi-config
Make sure you have changed the password for the default user pi in the step before - if not pls. do so now:
$ passwd
In addition what you would wanna do is either all or some of the following:
- Expand Filesystem (actually, NOOBS should have been taken care of already)
- Enable booting into command-line (at any time one can use
startxto bring up desktop env) - Adjust internationalization, regional and keyboard layout settings…
- Change hostname (under “Advanced Options”)…
Update your Raspbian OS:
$ sudo apt-get update
$ sudo apt-get upgrade
Make sure you run the latest firmware:
$ sudo rpi-update
You want to read:
*** Your firmware is already up to date

    $ sudo reboot
Setup Wifi
Either via the command line or with the help of the excellent wicd-curses:
$ sudo apt-get install wicd-curses

$ sudo wicd-curses
Now you either get a list of the wireless network found by the Pi or - an empty list :-(…
In case of the later, the reason might be that the Wifi dongle hasn’t been recognized. To fix that start wicd-curses then press P to open the preferences dialog. In here you’ll find a field labeled “Wireless Interface” - which is empty… you need to write wlan0 and then press F10 to save the setting.
In addition you might want to change some more preferences, e.g.:
- “Always switch to wired connection when available”
- “Automatically reconnect on connection loss”
Use your Raspberry Pi as a Webcam
Install the PHP-based RPi Cam Web Interface:

$ git clone https://github.com/silvanmelchior/RPi_Cam_Web_Interface.git
$ cd RPi_Cam_Web_Interface
Note: Understand what the script does BEFORE executing !!!
$ chmod u+x RPi_Cam_Web_Interface_Installer.sh
$ ./RPi_Cam_Web_Interface_Installer.sh install
Configure the RPi Cam Web Interface to autostart
$ ./RPi_Cam_Browser_Control_Installer.sh autostart_run

$ sudo reboot
Disable the camera led:
$ sudo vi /boot/config.txt

disable_camera_led=1

$ sudo reboot
Require HTTP Basic Authentication for access to Apache Webroot but allow w/ out from local network (LAN)
Follow the Apache HTTP Server Documentation on Authentication and Authorization…
Create password for user A_USERNAME:
$ htpasswd -c /some/path/to/passwd/passwords A_USERNAME
Edit /etc/apache2/sites-enabled/000-default:
    <Directory /var/www/>
            Options Indexes FollowSymLinks MultiViews
            AllowOverride None
            AuthType Basic
            AuthName "Access restricted"
            AuthUserFile /some/path/to/passwd/passwords
            Require user A_USERNAME
            Order allow,deny
            Allow from 192.168.0
            Satisfy any
    </Directory>
Check configuration and restart Apache service:
$ sudo apache2ctl configtest
$ sudo service apache2 restart
Get some realtime systems stats
Install scout_realtime, a Ruby GEM:
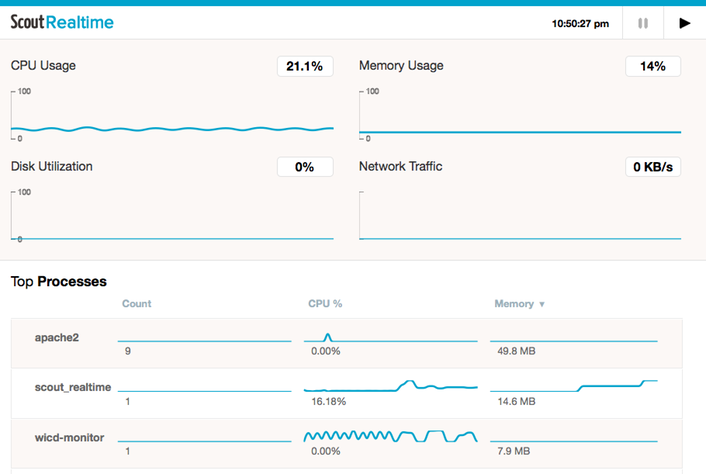
$ gem install scout_realtime
Start the daemon:
$ scout_realtime
You want to read:
Daemon has started successfully
Point your browser to http://PI-IP-ADDRESS:5555